Wednesday, July 25, 2007

Use Blur to Make White-Hot Text...or Red...or Blue...


I was tinkering around with Inkscape the other day when I noticed that not only can I blur shapes or images, but I can also blur text!
This card shows what happens when I put two text boxes with the same words in them on top of each other: the bottom one blurry and the top just regular.
The top layer transmits intensity and focus and the bottom blurry layer suggests that the text is so bright it is blurring your vision!

Tuesday, July 24, 2007

Inkscape as a Layout Tool


I love making custom cards. But sometimes my pictures don't always fit into the SendOutCards.com template like I would like them to. So I have learned how to make them press-ready in Inkscape.


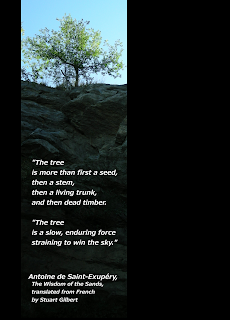
Here's an example of a card I designed from my hike up Battlecreek Canyon last week. The original picture was super long and skinny, which made a perfect place for me to place a nice quote. However, when I imported it into Picture Plus, I couldn't see the whole quote.
Rather than leave matters to chance, I prefer to lay the card out on the dimensions it will ultimately be printed on, in my case 5.375 x 7.5 inches.
To do this, I open Inkscape and then open the file menu to adjust the Document Properties. When that box opens, I change the Custom Width and Height to 5.375 x 7.5.
Now I need a backdrop. Black seems to suit the picture, so I use a rectangle tool to make a large black rectangle as big as the card dimensions. I can change the color of the inside ("Fill") and outline ("Stroke") of the rectangle by choosing Fill and Stroke from the Object menu and making the Fill and Stroke whatever color I want. I can also change the rectangle's color by choosing from the colors down at the bottom of the screen while I have the rectangle selected.
After the black background is in place, I import my tree picture, which I had previously edited and cropped in Gimp. I have to resize it a bit, though, because the .jpg picture file I have is set at a pretty high resolution. In order to shrink it down without accidentally making the picture distorted, I select the picture, hold down CRTL and then resize the picture. Holding down CTRL keeps the proportion of length and width the same, no matter how big or small you make it.
When the picture is the right size, I try moving it around different places on the background. I finally settle on a spot left of center.
Now for the finishing touch: the text. The A symbol on the left side of Inkscape is a Text tool. Use it to create the size of text block that you want, and then start typing. In order to change the font and size of the text you have selected, open the Text and Font dialogue from the Text menu. You can resize your text box at any time if you run out of room. Just click on the diamond on the lower right corner of the text box and move it around until you get the right size and shape that you want. (I will write more on typography soon.)
Lastly, in order for this file to work in Picture Plus, I need to Export the file to Bitmap. The normal file format for Inkscape files is .svg, but it is not compatible with many things. When I choose this option from the File menu, I can choose what I want to call the bitmap file, whether to export the page dimensions or the whole drawing, and also change the resolution of the final piece. I usually choose to export the Page and make the resolution 600 dpi, which is a good size for printing. If I were putting it on the web, I might use 90 dpi. The exported file is a .png, which is easily recognizable by most programs.
Have fun Inking around!


Saturday, June 30, 2007

Making Clouds in Inkscape

One of the newer features of Inkscape is the ability to blur the edges of things. Pretty cool for a vector-based program, eh? I tried out the blur feature on the simplest thing I could think of: Clouds.
It's really simple to make clouds in Inkscape:
1. Use the freehand tool to make a cloud-like outline.
2. With your cloud selected, choose the option Fill and Stroke from the Object menu.
3. Make the fill white and the stroke non-existent (x).
4. Use the Blur slider at the bottom of the window to adust how blurry you want your cloud. You may even want to make the cloud slightly transparent by using the Master opacity slider.
5. Once you are satisfied, have fun experimenting with more clouds!
Here is my experimental result:

Saturday, March 17, 2007

How do I download Inkscape?

How do you get this graphic goodness on your hard drive?

Easy!

1. Go to www.Inkscape.org

2. Look at the sidebar on the left of the website. You will see a button that says Download. Click on it.

Note: I recommend the stable release, which is currently version 0.45

3. Depending on the kind of operating system you have, there are different ways of downloading Inkscape (I use Windows, so I click on the link that says .exe Installer).

When I click on the link that says .exe Installer, I am transported to another website, www.SourceForge.net and the download starts automatically.

Since I have rather high security settings on Internet Explorer, a little yellow warning shows up at the top of the screen that tells me that IE blocked the download. If that happens, don't panic--just click on that warning and choose the option that says Download File.

4. When the download finishes, a dialogue will open that asks you if you want to run or save or cancel the application Inskape-0.45-2.win32.exe. Click on the button that says Run.

When the file is completely downloaded, I get another IE warning that asks me if I really want to download the file. What? Of COURSE I do! So again, I click the button that says Run.

*Note: If you have difficulty with the automatic download, there is a direct link on the SourceForge.net site that will start the download. Then the dialogue will open and you will click on the button that says Run.

5. Relax a minute while the setup program runs. Maybe get a soda or something. For me and my computer, it takes about 5 seconds before the Inkscape 0.45 Setup Wizard opens up.

When it opens, you will see a Welcome screen that asks you to close all your other applications before starting the final process. Click Next when you have done this.

The wizard will go to the next step, which is your license agreement. If you agree with the license agreement, click Next.

Now you get to choose which Components to install. I install ALL of them, so I just click Next, but if you are worried about space, you could uncheck the languages you don't need and THEN click Next.

Note: If you're worried about saving a few megabytes of space, chances are you may need a bigger hard drive to do graphic design.

The last step of the Installation Wizard is to choose where you want the program stored. I always choose the default, which is C:\Program Files\Inkscape, but you can save yours wherever you want.

When the Installation is complete, click Next and you will see the last stage of the Installation Wizard. At this point, you can choose to run Inkscape or save it for later and then click Finish.

Ahhh. Great graphic goodness at your fingertips!

Congratulations! You have just installed Inkscape!

Now you get to play! Mwahahahaha!